Sew Karen-ly Created...

If you have arrived here via a link (such as to a tutorial) click on "Sew Karen-ly Created" to return to the latest blog post. I invite you to my website to see a gallery of quilts and patterns available for purchase.
Comments are always appreciated, simply click the word "comments" at the end of each post to leave your message. Thanks for stopping by!

Friday 30 June 2017

"Mon Canada"

There are many quilts being made in honour of Canada's 150th birthday, but none more unique than this one from Clare, Nova Scotia.Guilde Acadienne de Clare made this quilt which depicts the Acadian contribution to Canada. Designed by guild president Joan Tufts, many members had a hand in stitching the patchwork, appliqueing and embroidering blocks, as well as the hand quilting. Entitled "Mon Canada", the centre of the quilt features the Grand-Pré church, considered the most important historic site of the Acadian people, and recalls their saddest and most heroic moments. You can see colourful houses,forests, fishing boats, lobsters, and the local lighthouse overlooking Baie-Sainte Marie. Poppies represent the Acadian veterans who served to defend our country. Also shown is the Acadian Métis Association symbol, and examples of 3 languages: French, English, and Michif (mixed language that uses French nouns with Cree verbs and Cree grammar.) Look for the N.S.tartan and the Canadian maple leaf, a thistle and laurel, as well as the Acadian star.
"Mon Canada" had its debut exhibit at the Canadian Quilters' Association "Quilt Canada" conference in Toronto last month, and will be officially unveiled
at tomorrow's July 1st municipal ceremonies in Clare. It will travel the region throughout the year, including the annual Quilt show in Saulnierville (watch for more info to follow)..
Its permanent home will be at the Saulnierville Parish hall where the guild meets to sew every week. (A little bird told me it might also pay a visit to Amherst during the Nova Scotia Fibre Arts Festival!) Thank you to Joan Tufts for sharing these wonderful pictures and story of a very meaningful quilt.


Tuesday 27 June 2017

Four Grand

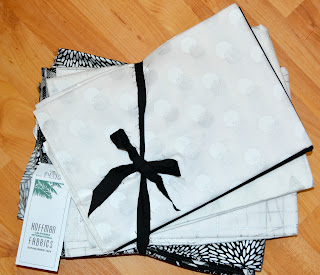
I've been sewing up a storm, and have a new pattern available for a set of really cool table mats.  The design was inspired by this gorgeous,mostly black and white fabric collection called "Sparkle and Fade" from Hoffman California Fabrics.
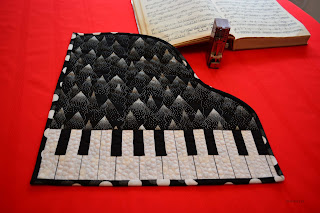
The fabric is elegant and rich, the ebony and ivory of a grand piano.  Or even better -four grand pianos! I chose different prints for each, two white and two black.  This one made me think of John Lennon's famous white piano :)
A pure white low loft needle punch batting was used, since place mats shouldn't be too puffy. The white keys were quilted heavily with pebbles, and the black ones left as is so that they pop up. I used 50 weight Aurifil thread for quilting the keys, and Aurifil silver metallic to work a simple serpentine stitch on the piano itself.
After quilting, 12 weight Aurifil was used to topstitch straight lines down the keys.  Simple, but effective. This thread is available from my thread store.


I love the black polka dot binding!

The mats measure about 16" each way.  What's really cool is that they all fit together to make a centrepiece. They are very easy to make, as the keyboard is strip-pieced, and the body of the piano is just one piece.

 The pattern is available as a printed copy from my website, or as an instant download here.


Saturday 17 June 2017

Playing With a Prototype

I've been working on a new pattern and decided I was ready to sew a first draft.  When designing a patchwork project, it is imperative that all the pieces fit precisely; the math has to work, as does the piecing that tests this math.  Normally I design on the computer, but this piece has an odd-shaped background that was easier to draw with paper and pencil.  
Once sewn, every individual patch is measured to ensure that the seam allowance is a perfect 1/4". You'd never do this on your own quilt, but the pattern has to be bang on. Because this is just a draft, I didn't want to spend a lot of time on the "how will I quilt this" question, instead opting to use a stencil I picked up this winter at Mrs Pugsley's. It pretty much fit the space without adjustment.  Isn't it elegant?
With black fabric, it is super simple to transfer the design using a chalk pounce.  Simply lay the stencil on the fabric and slide the pounce over it.
The chalk lines are very visible for quilting.
The lines come right off afterwards;  the package says to use a hot iron, which has worked well for me in the past, but I just brushed them off this time. The batting is a scrap of polyester needlepunch and I didn't think a hot iron would do it any favours. The quilting isn't perfect - "quickly done" was my aim - but even so it's passable, I think.


I stitched the binding on last evening.  When all was said and done, my calculations were out 1/8", which is an easy fix.  The adjustments have now been made to the pattern, and I feel confident that I am ready to start cutting my good fabric.  I may even use this stencil again.

Wednesday 7 June 2017

Row By Row 2017: "Canada On The Go"

For those of you who don't know, "Row By Row" is a shop hop for quilters whereby they visit a participating shop and receive a free pattern for a row of a quilt. Each row measures 9" x 36" in either a vertical or horizontal orientation. When enough rows are collected, they are sewn together into a quilt. It seems an easy thing, to simply pick up a free pattern at a shop, but there is a lot that goes on behind the scenes to make a successful "rowing" experience for quilters.

Each year has a different theme, and this year it is "On The Go". Last year, I had the pleasure of designing Mrs Pugsley's Emporium's first Row By Row.  The theme was "Home Sweet Home", and her building is a perfect home for quilters!
When Mrs Pugsley's asked again for this year, tying Canada's sesquicentennial celebration to the theme seemed a perfect match: Canada On The Go! Our area was very involved in the creation of our country, as Amherst was home to four Fathers of Confederation: Edward B. Chandler, Robert B. Dickey, Johnathan McCully, and Sir Charles Tupper. I came up with a design which worked both horizontally and vertically and submitted a computer sketch to Mrs P's for approval. Once she commissioned the piece, I set about getting approval from the Canadian Heritage Commission, who owns the copyrights on Canadian symbols. The application was made in early January of this year. You can see that originally, I intended to use the 1967 centennial logo to be part of the progression, as well as our current Canada 150 logo.

Approval came for the use of the Canada 150 logo, in a very official looking 7 page document.   What an honour to hold a license granted by "Her Majesty the Queen in Right of Canada"!
By this time, it was the end of February, and I now realized that the copyright for the (absolutely brilliantly designed) centennial logo belonged to its creator, Stuart Ash. I had no idea how to get in touch with him, and was fearful that permission could not be secured in time. My clever artist friend, Cheryl Coville, suggested a plain maple leaf might work as well, so the design was altered slightly. Thank you, Cheryl - I think I like it even better this way. :)

Mrs Pugsley chose the fabrics she wanted to use: Kona solids in jungle green, chartreuse, goldfish, citrus, Prussian blue, berry, mulberry, honeysuckle, water, cardinal,and - of course!- Canada Red. She special ordered in the colours for the samples. While I waited for fabric, I drew up the templates and piecing diagrams on the computer, and roughed out the instructions. Mrs. P had to decide at this point how she would be doing the packaging, so that the instructions would be formatted to the correct sized paper to fit attractively in her kit bags.
The blocks are curved flying geese, whose points are foundation pieced. Easy as 1, 2 3. Because the templates are drawn on the computer, they fit together perfectly. The Canada 150 logo is even simpler to add, with fusible appliqué. With a white background, you can place the top over the pattern, which shows through for correct placement of the elements.

I stitched both a vertical and a horizontal version.  Mrs P chose a Nova Scotia tartan for the back of one, and a maple leaf print for the other.
For the vertical one, I quilted a feather trailing down the length of the banner.
These are champagne bubbles for our celebration!
I took the banners to Fort Beausejour to photograph. As a national historic site, it seemed a suitable spot.

By now, it's April...and you'll see we still had snow. The park was not yet open for the season, but there are always visitors there.
As often as I've been to Fort Beausejour, never has the wind not been blowing a gale, and that day was no exception. It is a challenging, albeit beautiful, spot to photograph a quilt.

It was a bit of a go, slogging through the muck, but I was determined to get some pictures. ("Please don't let me drop that white banner here!")


A fence - yay!
Of about 20 taken, this was the only shot where the banner was not flipped back on itself by the wind!
This is my favourite;  it was taken on the cannons, which point out over the Tantramar Marsh towards Fort Lawrence, in Nova Scotia.


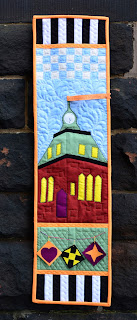
For good measure, we took a few against the clock tower building where Mrs Pugsley's Emporium is housed.  As this building was designed by Dominion architect Thomas Fuller (who also designed the first Parliament Buildings in Ottawa), it is also a fitting backdrop.
At this point, the pattern instructions were finalized and sent to quilt editor Cheryl Coville in Ontario for checking. Once that was done, everything was delivered to Beth at Mrs Pugsley's, who has the patterns professionally printed (not photocopied) in colour, and needed lots of lead time to get her proofs back before the final printing could be done. Beth personally checked and double checked to make sure everything printed to the exact size. She ordered in bolts and bolts of extra fabric to make the kits, and now she and Jackie are busily cutting and packaging.
Each of the shops involved in this program has put a great deal of effort and expense into making this a successful experience. Personally, I had a lot of  fun visiting shops last summer in my travels and checking out their interpretation of the theme. Row By Row kicks off two weeks from today on June 21. You can stop in to pick up this free pattern -or purchase a kit to make it exactly as shown - from Mrs Pugsley's Emporium, 50 Victoria Street E., Amherst, Nova Scotia   It's a great remembrance to mark Canada's special anniversary year.  

Sunday 4 June 2017

Fun With Stripes

My mother used to say that sewing with stripes "dazzled her eyes"; that dazzle can be lots of fun!
I purchased this stripe at Mrs Pugsley's Emporium on Saturday.  I thought it was black and cream, but it turned out to be dark brown when I got it home.  No matter, it's still a high-contrast stripe.
I sliced it into 2-1/2" strips and sewed them back together, offsetting the stripe colours instead of matching them.
My go-to method for perfect circles is to use a coffee filer;  for this project, I chose one of my biggest Bun filters.
I folded it in quarters to line it up on the vertical stripes.
Then I stitched around the entire edge of the filter.
Afterwards, I trimmed around the filter using scissors, and cut an X slit in the centre for turning.
Voila!  A good press with a hot iron and I have a perfect circle.  The filter tears easily off the back, leaving neatly pressed under edges for appliqueing in place. 
It's a cool effect, using just one fabric.  And Mom was right:  it does dazzle the eyes! :)
(and Polly!)